
screenshotss?
6 posts
• Page 1 of 1


![]() by Hunneh_Buns » Nov 3rd, '06, 03:04
by Hunneh_Buns » Nov 3rd, '06, 03:04
Press the Print Screen button on your keyboard and paste it in paint.
- Hunneh_Buns
- Band Leader

- Posts: 6773
- Joined: Jul 19th, '05, 22:08
- Gender: Female


![]() by anonymous99 » Nov 3rd, '06, 18:22
by anonymous99 » Nov 3rd, '06, 18:22
google.com 
anonymous99
a positive anything is better than a negative nothin - Big Proof
http://www.bigproof4ever.com
http://www.myspace.com/intrinzik
a positive anything is better than a negative nothin - Big Proof
http://www.bigproof4ever.com
http://www.myspace.com/intrinzik
- anonymous99
- Soldier

- Posts: 1331
- Joined: Sep 13th, '06, 13:10
![]() by Hunneh_Buns » Nov 4th, '06, 00:55
by Hunneh_Buns » Nov 4th, '06, 00:55
Push the Apple Key + Shift + 3. This will take a picture of the whole screen. To take a screenie of only a designated section of the screen, push the Apple Key + Shift + 4. A little cursor will pop up. Click and drag it over the section you want to take a screenie of, then let go. If you want to know where the Apple key is located on your keyboard, refer the the picture below.

After you have taken your screenie open up Appleworks. Appleworks is an application that should be on all Macintosh computers. If you can't find Appleworks on your desktop/dock, open up your Finder and search "Appleworks".

If you can't find it that way, look through your Applications folder.

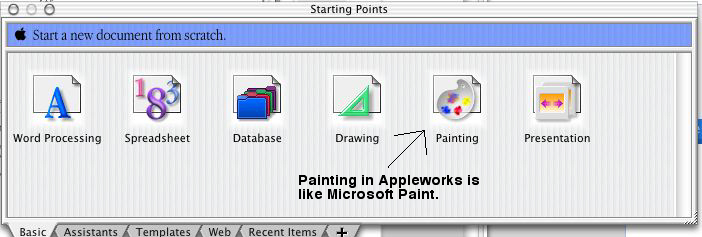
Once you have Appleworks open select the "Paint" icon. If you want to know what it looks like, refer to the picture below.
Once you have Appleworks open, go to File/Open. A box will open up, and it will show all of your files. In the little drop section where it says, "File Format", select "All Formats". After doing that, select your screenie(s). Your screenies should be in your desktop and named Picture 1, Picture 2, and so on.
After you've opened up the pictures, drag them into the Paint window. Then edit them as you wish. If you need help using Appleworks, hit the "Help" button on your keyboard.
Once you have finished editing, go to File/Save As. Name your file, and under the "File Format" drop-down menu, select the Format as "JPEG" or "GIF". Hit "Save", and then select your desired picture quality.
After you have taken your screenie open up Appleworks. Appleworks is an application that should be on all Macintosh computers. If you can't find Appleworks on your desktop/dock, open up your Finder and search "Appleworks".
If you can't find it that way, look through your Applications folder.
Once you have Appleworks open select the "Paint" icon. If you want to know what it looks like, refer to the picture below.
Once you have Appleworks open, go to File/Open. A box will open up, and it will show all of your files. In the little drop section where it says, "File Format", select "All Formats". After doing that, select your screenie(s). Your screenies should be in your desktop and named Picture 1, Picture 2, and so on.
After you've opened up the pictures, drag them into the Paint window. Then edit them as you wish. If you need help using Appleworks, hit the "Help" button on your keyboard.
Once you have finished editing, go to File/Save As. Name your file, and under the "File Format" drop-down menu, select the Format as "JPEG" or "GIF". Hit "Save", and then select your desired picture quality.
- Hunneh_Buns
- Band Leader
- Posts: 6773
- Joined: Jul 19th, '05, 22:08
- Gender: Female

6 posts
• Page 1 of 1
Return to Computing & Technology
Who is online
Users browsing this forum: No registered users